How To Run Tayga for an IPv6 Only Network on OPNsense
The modern internet is coming, so it's time to get all your devices off the legacy internet.
Introduction
The modern internet is here! In fact, it has actually been here since June 6, 2012, on their world launch event. Why are we not using it? That is another question for another post. But the bottom line is IPv6 is great!
There is no Network Address Translation (NAT) with IPv6. Every device gets one IP address and that is that. These are called a Global Unicast Address (GUA) which is an IPv6 device that is accessible and routed on the internet. There are a few different types of IPv6 addresses, but these are the most important ones for global network routing. If you have the GUA of a device that is on the same LAN as you, it will talk directly to that device through the network switch, whilst also being able to be routed on the internet. Sort of like how IPv4 was meant to be, until we ran out of addresses.
Since there is no NAT with IPv6, some people might think this is insecure, which it isn’t. Even though the address is available to the internet, it still needs to have its packets accepted by the firewall/router. Since our router is only doing firewalling for our IPv6 address space on our LAN, this saves the computational resources that the router is using, which is great!
IPv6 also makes setting up your internet heaps easier. Since we no longer have to deal with NAT and Port Forwarding, everything is simpler and cleaner. Of course a lot of people are scared of IPv6, since they see that big address and have no clue what they are looking at, but with a few videos it starts to make a lot more sense.
Going IPv6-only
So going IPv6-only is actually really easy to do. If you already have a dual-stack setup with IPv4 and IPv6, you just turn off IPv4 and bam! End of the blog post… of course you will lose connectivity to a bunch of websites that are IPv4 only (looking at you github.com).
Of course this isn’t very feasible since there are a lot of IPv4 only websites out there that widely used.
The Next Best Thing - NAT64
Network Address and Protocol Translation from IPv6 Clients to IPv4 Servers or Stateful NAT64 as per RFC 6146 is a translation layer for IPv6-only clients to connect to IPv4-only hosts.
If we tell our LAN clients to turn off their IPv4 internet and use our NAT64, we can create a mostly IPv6 network with IPv4 as a backup if sites don’t support it.
We can do this with DHCP option 108 or RFC 8925. This DHCP option if advertised can tell clients that support IPv6 networks, to turn off their IPv4, and clients that don’t recognise this option will stay on the legacy dual-stack IPv4 way.
Setting up Tayga for NAT64 on OPNsense
First things first. You will need some things to start off.
- An OPNsense router that has a dual-stack configuration for IPv4 and IPv6-only
And that’s it really…
First install the Tayga package on your OPNsense box. You can find it in System > Firmware > Plugins under the name os-tayga. Hit the installation button and wait for it to finish.
Navigate to Services > Tayga so we can begin setting up Tayga.
You have a few things to set up here, and it can get technical explaining them, so just follow this image instead.
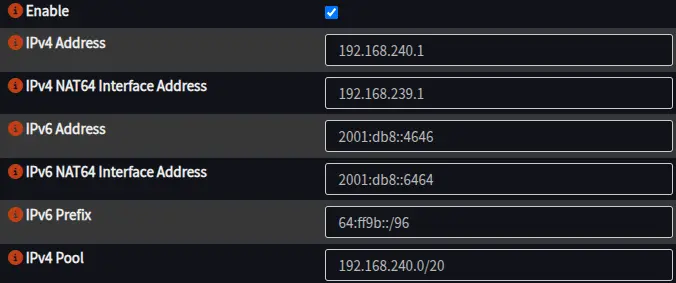
You can keep the IPv4 addresses and address pool the same unless they conflict with your local network.
Also make sure to change your IPv6 addresses to use your own IPv6 prefix.
Tayga will take packets routed through the well-known IPv6 prefix 64:ff9b::/96 as defined in RFC 6052 and translates the IPv6 address to an IPv4 address. Since the entire address space of IPv6 is 128 bits, you can encapsulate all the IPv4 address space in a /96 block of IPv6. Pretty cool!
Tayga then sends that packet to its internal IPv4 address which then routes it to the world.
A good note in this example, I used the well known IPv6 prefix of 64:ff9b::/96. Using this prefix, you will lose connection to your internal IPv4 addresses on your LAN, if this is an issue for you, you can use your own /96 block of IPv6 for your prefix and have your LAN addresses routed again. The only downside of this is that some clients might not have support for using other IPv6 prefixes. Maybe try and test it out on your LAN and see if you run into any issues, then later change it back if you need too.
Tayga also needs some firewall rules to function correctly.
- Go to
Firewall > Rules > Tayga, add a new rule, set the TCP/IP Version to IPv4+IPv6, leave all other settings to their default values and save. - Go to
Firewall > Settings > Normalization, add a new rule, set the Interface toTayga, leave all other settings to their default values and save (required for packet fragmentation). - Go to
Firewall > NAT > Outbound, add a new rule, set the Interface toWAN, set Source address toSingle host or network, enter your Tayga IPv4 Pool which would be192.168.240.0/20, leave all other settings to their default values and save.
These were taken from the OPNsense Documentation, so feel free to check that out if you are having trouble following.
Simply hit apply and save the configuration, and that is now it!
Testing Tayga
You should now be able to ping your NAT64 prefix on your client devices with IPv6 and it should work.
1
2
3
4
5
6
7
8
9
pc@ss ~ ping -c 3 -6 64:ff9b::9.9.9.9
PING 64:ff9b::9.9.9.9(64:ff9b::909:909) 56 data bytes
64 bytes from 64:ff9b::909:909: icmp_seq=1 ttl=53 time=29.0 ms
64 bytes from 64:ff9b::909:909: icmp_seq=2 ttl=53 time=30.8 ms
64 bytes from 64:ff9b::909:909: icmp_seq=3 ttl=53 time=48.4 ms

--- 64:ff9b::9.9.9.9 ping statistics ---
3 packets transmitted, 3 received, 0% packet loss, time 2002ms
rtt min/avg/max/mdev = 29.046/36.070/48.404/8.749 ms
In this example, I just pinged the Quad9 public DNS resolver. You can write your IPv6 prefix like I did above and then just add the IPv4 address at the end, and it should translate it for you, pretty nifty.
You can also run this test in OPNsense by going to Interfaces > Diagnostics > Trace Route. Enter in the hostname or IP section 64:ff9b::9.9.9.9 and hit apply. You should see it go through and work.
Setting Up DNS64
Now that we have our clients able to use our NAT64 gateway, we need to also provide them a way to communicate with it. The way DNS64 works, is it builds on top of the NAT64 gateway and combines DNS records with that.
- If you have a website that has an A record pointed to
198.51.100.1but no AAAA record, DNS64 tries the AAAA record (that doesn’t exist). - It then tries the A record, if that resolves properly it will then take your NAT64 prefix
64:ff9b::/96and put the IPv4 address on the end64:ff9b::c633:6401which it then returns to clients.
Great! Now let’s set it up.
Setting up DNS64 can be different for every DNS server. In Adguard Home, you can specify to turn DNS64 on in the config file and then also specify the prefix.
For the sake of this tutorial though, we are going to use Unbound since it is already natively built into OPNsense and is probably what you are already running now.
Simply go to Services > Unbound DNS > General and copy these settings.
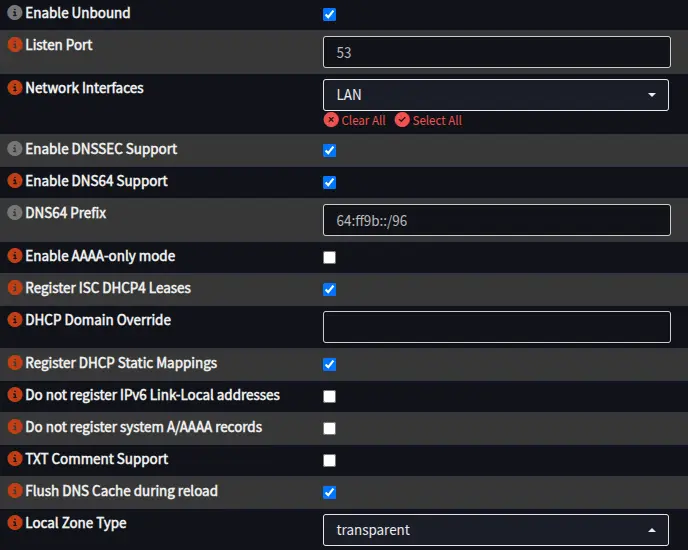
After that hit apply then restart the service. Now we also need to add in some DNS rules so we can have our clients find our NAT64 prefix.
Clients use can either use the PREF64 router advertisement as per RFC 8781, or the ipv4only.arpa domain discovery as per RFC 8880. Since OPNsense doesn’t support PREF64 in its router advertisements yet, we can instead use the ipv4only.arpa DNS lookup.
Head to the Services > Unbound DNS > Overrides section and enter in two DNS records.
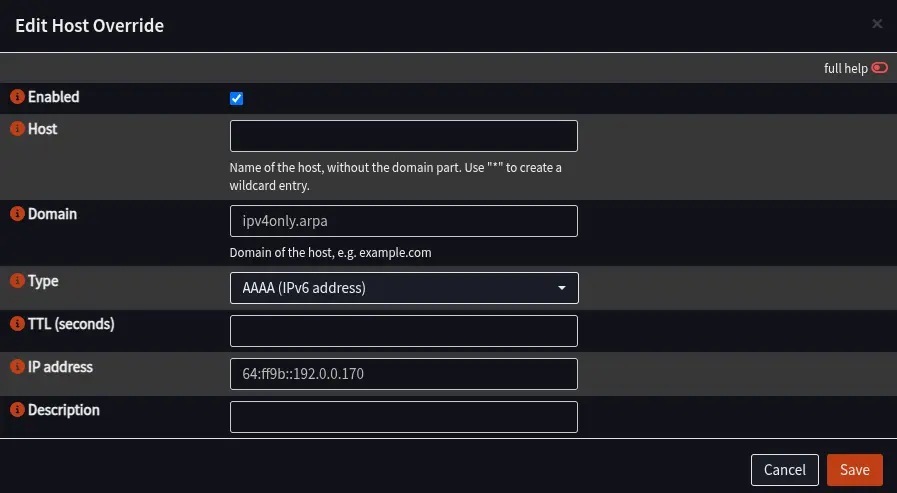
Make one DNS record with the domain ipv4only.arpa, make the IP address 64:ff9b::192.0.0.170. Save the rule, clone that same rule, then change the IP address to 64:ff9b::192.0.0.171, also save the rule, apply changes, and restart Unbound.
Now your LAN clients can discover the IPv6 NAT64 prefix through DNS if they are configured to use OPNsense’s DNS server.
Telling Clients to Turn Off IPv4
Now that we have a working IPv6 NAT64 and DNS64, we can tell our clients to turn off IPv4 if they support it. Since we are probably already running a DHCP server with ISC DHCPV4, we just need to add a rule to it.
Head to Services > ISC DHCPV4 > [LAN] and scroll until you find the “Additional Options”. From here we will create a new option with number 108, it is an Unsigned 32-bit integer, also set a decently long value for the time, I chose 84600 for my case which is 1 day.

Now our clients that support DHCP option 108 will see this and know they are on an IPv6-only network, turn off their IPv4, and start searching for the NAT64 prefix which we configured earlier.
NAT64 + DNS64 Doesn’t Always Work
Since we set up all this, it sometimes still is not enough for clients to fully operate on just IPv6. Even though we have done all this translation from IPv6 to IPv4, some apps or websites use hard-coded IPv4 literals in their code. That means no domains for our DNS64 resolver to translate, which equals timeouts and no connectivity. This is mostly prevalent in apps that use WebRTC, so most VoIP and streaming services.
Introducing the CLAT
Thankfully, there is a fix for this, and its name is a CLAT or a 464XLAT as per the RFC 6877. This nifty piece of software will be activated when an IPv6-only client recognises it is on an IPv6-only network, which then triggers it to enable its 464XLAT.
A 464XLAT will create a dummy internal IPv4 address on the client that will then have all its traffic routed through the NAT64 prefix that it found in the prefix discovery phase. A great workaround for those pesky legacy IPv4 applications.
There are even open-source implementations of this that will run on Linux. Most updated Apple devices and Android devices also have their own built-in CLAT for this purpose as well. Mobile providers that have switched to IPv6 only mobile networks have also adopted this functionality.
With all these technologies combined (NAT64, DNS64, 464XLAT) you can run your own IPv6 network perfectly and connect to any legacy IPv4 websites or applications just perfectly. I have been running this setup in my own LAN network for about 3 months now, and I haven’t had any issues with it yet.
Android Issues
I have found that android devices seem to struggle on Wi-Fi networks that are using the DHCP option 108 to turn off their IPv4.
For some reason due to these issues here, Android seems to really struggle with getting reliable router advertisements. This is due to the Android developers heavy stance on battery saving.
There seems to be a bit of maths involved with trying to get this to work. I’ll put another link here so you can read about that one. Since currently, I don’t have access to change my AP’s dtim_multiplier, I seem to be one of the unlucky few that has to deal with this issue on hand.
The tradeoff between a battery efficient phone, and one that has a network connection all the time is hard to manage. Even following what the developers recommend in this issue, I still couldn’t get a reliable Wi-Fi connection that wouldn’t drop out every 30 minutes.
Apple devices don’t have this problem, as they still support DHCPV6, but if you are using SLAAC only for your IPv6 LAN network, then they might experience these issues as well. But I’m not 100% sure as the feedback I have gotten from people using Apple devices in my home are mixed.
After weeks of struggling, I was only able to fix this issue by setting the OPNsense router advertisements to these settings.
- Router Advertisements: Assisted or Stateless
- Minimum Interval: 300
- Maximum Interval: 600
- AdvDefaultLifetime: 7200
- AdvValidLifetime: 7200
- AdvPreferredLifetime: 7200
- AdvRDNSSLifetime: 7200
- AdvDNSSLLifetime: 7200
- AdvRouteLifetime: 7200
I found the issues seem to lie with the “Unmanaged” mode for Router Advertisements, as that doesn’t use any DHCP at all. By turning this to “Assisted” or ”Stateless” and then turning on the DHCPv6 server, it seemed to make IPv6 connections more reliable for both the gateway dropping out, and the phone missing the RA.
I also found that enabling gateway monitoring seems to make the connection more reliable as well. System > Gateways > Configuration from here you can edit the IPv6 interface and make sure the option Disable Gateway Monitoring is unchecked.
Conclusion
Hopefully there will be a time when the entire internet will be IPv6-only, but I don’t think that will be coming anytime soon, since most businesses straight up just turn off IPv6 all together.
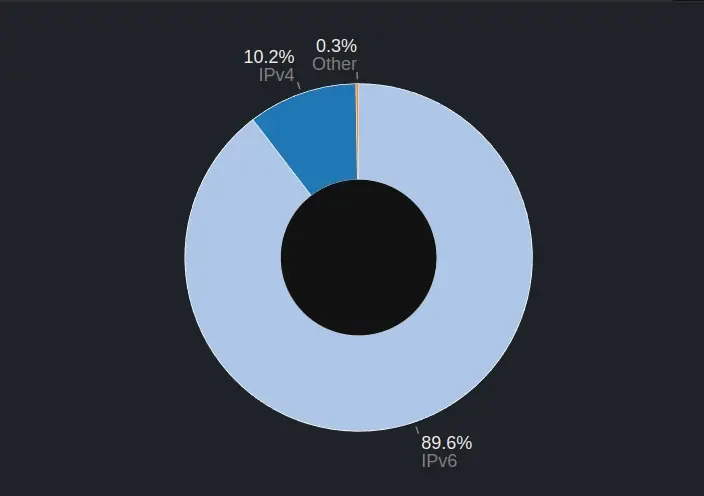
With all of this, you should see a massive increase of IPv6 only traffic on your network. Here is my WAN interface’s traffic captured to show IPv4 traffic vs IPv6 traffic.